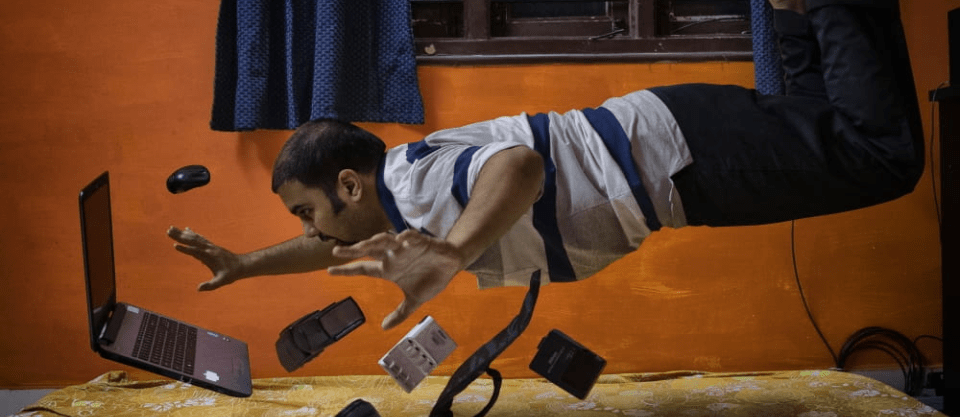
One evening, when I was lying on the bed with my laptop and camera bag next to me; editing some of my photos; and boom! This happens!
Houston, we have a problem.
Levitation Photography
You may have not heard of the terminology, but you must have definitely seen some stunning levitation photography on the internet. In levitation pictures, everything seems to be defying gravity. The model is floating, the objects around are floating and everything is floating.
Levitation photography is a simple concept of layer masking in Photoshop. To break it down in simple terms, a picture of the scene is taken without any props and models. Later, several pictures are taken with the model and the props by suspending them in air. Then they are all brought together in Photoshop by layer masking to form one image after eliminating the suspending equipment using the first image of the blank scene. Some photographers also prefer to use the cropping method rather than layer masking.
When you learn video editing, you learn that there are two phases to creating a levitation shot that are shooting and post-processing.
Shooting
1. Work up a scene
Levitation photography is a creative process. You don’t actually need a pricey camera for it, even a basic point and shoot camera will help you create a good levitation photograph. Just work up a good scene. Think of various different positions in which you can make your model float in the air and how is it that you will do it. Normal methods which photographers use to suspend their model are:
- Using ropes. Use real strong ones so they can support the weight of the model.
- Using a trampoline or jump method, ask your model to jump up in the air while making the desired pose. Use burst mode to capture shots in succession.
- Using stools, tables, chairs or any other furniture for support.
But you don’t have to stick to only these methods. Whatever (safe) method that you can come up with to float your model, will work.
Learn Photography
Master the fundamentals of photography, from the basics to advanced techniques, and become a professional photographer.

2. Set-up your camera
Apart from the trampoline method, if you are using any other support methods to keep you model suspended in the air, then you will have to use the tripod. Set your focus on the model and compose your scene to start shooting. Before you start taking pictures of the model, it’s best to take a picture of the blank scene.

I used the support method here. I used this bucket to get myself in the position and used the self timer on my camera to get this shot.

I couldn’t actually balance myself on the bucket. My tummy hurt. So I waited for the self timer to go off and just as it was about to happen, I posed.
It’s a good strategy to include some props as well in your picture. It creates a better impact and adds to the story behind your scene.

It’s important to shoot the props as well in the same lighting condition. If you shoot the props in a different light it will easily show when you try to bring them in the scene together. It will make the whole picture look artificial.
Once you have taken all the necessary shots, move on to processing your images and creating your levitation photograph.
Processing
If you have shot a raw photo, you can make minor adjustments in camera RAW at this point, sync all your images and open them in Photoshop. Open them all in different Photoshop windows.

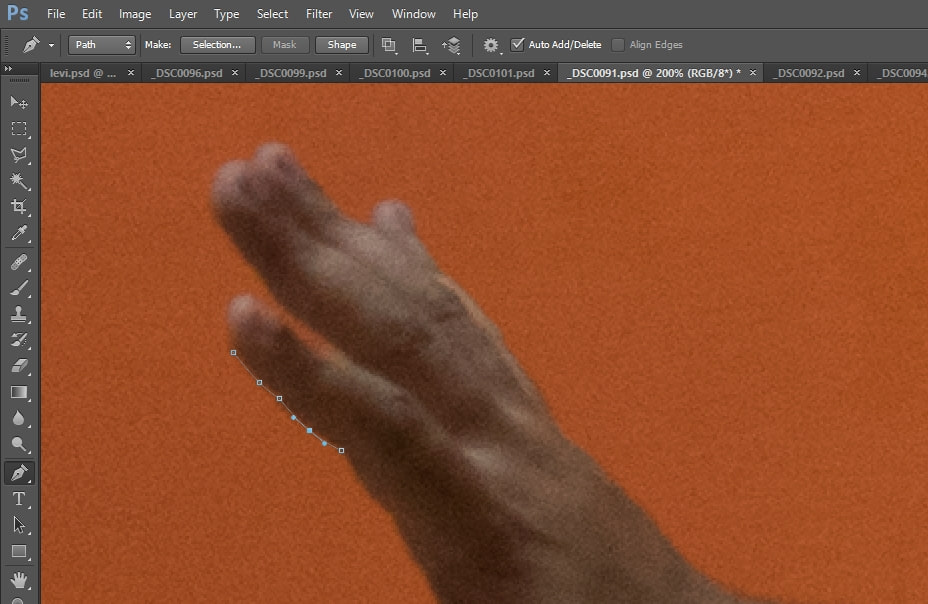
Use the pen tool to draw a path along the contours of the model.
Make the selection from the path by right clicking on the image. Press ctrl + X (command + X for mac) and then ctrl + v (command + V for mac) this will cut the selection out and place it on a separate layer on top of the image.

Do this for all the props as well and save these files separately (just in case).
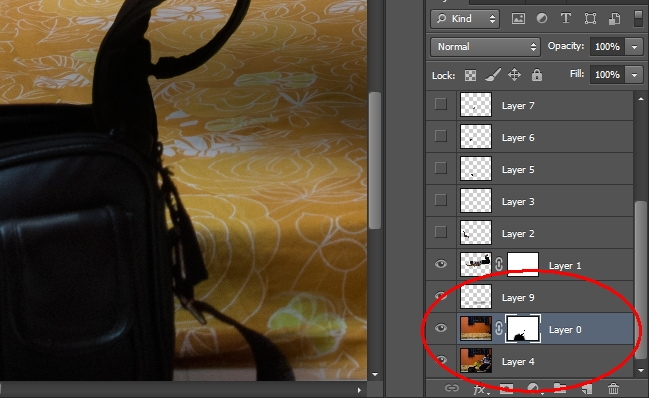
To bring out the camera bag in front I will use the layer masking method. Since I am not going to move it from its position in our levitation scene, it’s easier to just layer mask it under the blank scene and bring out the bag in the blank scene.
Open the blank scene image. Go to the file where you had the model cropped. Ctrl + click on the layer in the layers panel to select the model. Press ctrl + c to copy this layer. Go back to the file with the empty scene and paste your model here. I will also tilt the position a bit to give a more floating effect. Continue to do so with all the other props and bring them into the scene.

Crop and compose the scene further if necessary. I am going to increase the structure and saturation a bit in nik viveza (Photoshop plugin).

Points to remember
Looking to sharpen your photography skills? Join our top-rated Professional Diploma in Photography today!


