Autofocus is great, but like anything with “auto” in the name, it’s not completely infallible. An object moving in front of your subject, a low contrast scene, or shooting through objects like a chain link fence can all throw off the autofocus system, resulting in a soft shot or even no shot at all.
Using manual focus is an obvious solution—but manual focus isn’t exactly easy to get sharp images with either. Manual focus—just like manual flash modes—requires a bit of know-how and some practice to get right. When you’re facing one of the many scenarios that make it better to shoot with manual focus, here’s how what you need to know about manual focus in order to get a sharp shot.
How Manual Focus Works
Manual focus works based on distance. If you look at the barrel of your lens, you’ll see distance markers that go up to infinity. If you had time, patience, a tripod and measuring tape, you could get a tack sharp image by measuring the distance to the subject exactly, but that’s not really practical.
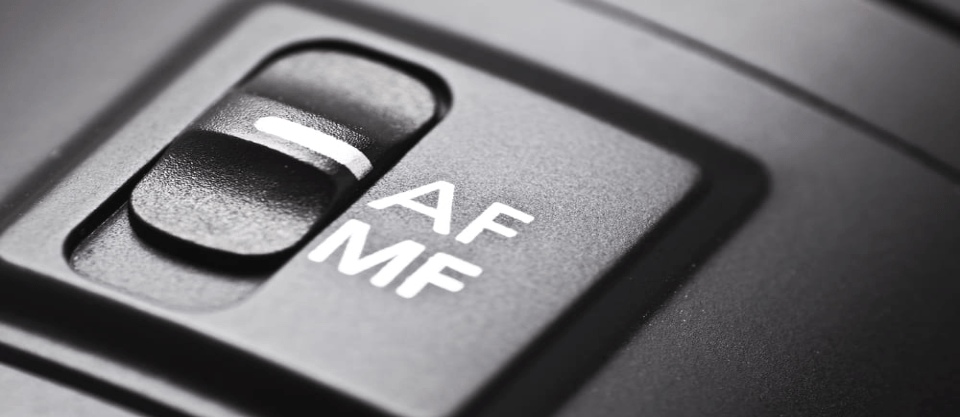
Most DSLRs switch to manual focus by using a switch on the lens, often marked with A and M or A/M. Switching to manual focus is usually just as simple as flipping that switch. Each camera may differ a bit, so check with your owner’s manual if you aren’t sure.
Adjusting the focus is done simply by turning the ring around the front part of the lens. Turning the ring clockwise will focus on objects that are closer to the camera, and vice versa. Since manual focus works based on distance, you could also move the camera instead of turning the lens—this is a popular manual focus method among macro photographers.
How to Use Manual Focus for Sharp Shots
Switching to manual focus is as easy as flipping that switch on the lens barrel. Getting your subject sharp, however, isn’t quite so simple. So how do you get a sharp shot with manual focus? There are a few tricks and techniques that increase the probability of getting a sharp shot.
Learn Photography
Master the fundamentals of photography, from the basics to advanced techniques, and become a professional photographer.

Use Live View instead of the viewfinder.
Typically, it’s easy to see if a shot is sharp or not by using the LCD screen instead of the viewfinder. Start by turning Live View on, it’s in the menu for most Canon cameras and with a LV shortcut button on most Nikons.
Live View comes in handy—click the button with the magnifying glass to zoom in on your subject (on most cameras, you can click more than once to get in even closer). Use the arrow keys to move your view if the subject isn’t in the center. When you are zoomed in on your subject, it’s easier to see if the subject is sharp as you turn the focus ring.
Try pre-focusing for action.
 While autofocus is usually best for action shots, there are a few scenarios where manual focus still wins out; like macro with a moving subject or shooting a race through a fence. How do you get a sharp shot without missing the moment?
Pre-focusing on a distance where you expect the subject to be allows you to capture shots with manual focus quickly. This means focusing on a flower before the bug lands on it, or focusing on a nesting area in wildlife photography. Of course, this method only works with subjects that have predictable movement patterns. Remember as you set your prefocus that manual focus is based on distance, so be sure to choose a distance that you expect your subject to be at momentarily.
Use Camera-Assisted Manual Focus
Camera manufacturers know how difficult it is to use manual focus, so many of them equip their cameras with features to help. On a Nikon camera, watch the bottom left corner of the viewfinder as you rotate that focus ring. When your image is in focus, a circle will appear, when it’s not, there are arrows indicating which direction you should adjust. To get that focus assist to really help, use the single point focus area mode and move the point over your subject.
On a Canon camera, the focus point that is in focus will light up when the proper focus is achieved. A focus confirmation light will also turn on.
Many mirrorless cameras with electronic viewfinders also come equipped with focus peaking. This feature highlights the part of the image that’s in focus in red, so you can see where your focus lies. Look for the feature in your camera menu to adjust just how it works and to turn it on and off.
Manual focus is a great tool—but it does take some practice and the right techniques to master. Switch to manual focus on your DSLR by using the switch on the lens and turning the front ring to adjust. Using Live View and zooming in on the subject makes it easier to get sharp shots. If your subject is moving, try pre-focusing on a spot where you anticipate they will be. And, get to know your camera’s manual focus assistance features. Like learning manual modes, switching off autofocus requires some practice, but it is often worth the results.
Looking to sharpen your photography skills? Join our top-rated online photography course today!


